


If You Don’t Use Enough, You Didn’t Caraway
For the most part, sources have concurred that the spices and herbs in this series do come mostly from where they think they do. That’s a good thing. There have been a few quibbles, but generally it can be considered a consistently agreed upon lineage.
Caraway defies such precision, with origins being suggested Western Asia, Europe, North Africa, and ancient traces found in Switzerland as well as Ancient Rome.
 Adding to the vastness of its reputation are various cultures differing identifications, “with names deriving from the Latin cuminum (cumin), the Greek karon (again, cumin), which was adapted into Latin as carum (now meaning caraway), and the Sanskrit karavi, sometimes translated as ‘caraway’” and sometimes called fennel. As if that wasn’t more than enough of an identity crisis, some think the name came from Arabic.[1]
With our minds abuzz about the confusing provenance and nomenclature, that is both and herb and a spice seems to be almost too much. As it happens, it is not. It is just the right amount.
Red Onion Confit
A nice sweet/tart condiment for a charcuterie board or simply cheese and crackers. Also can be served warm with lamb, goose or duck dishes or as a component to a sandwich. Yum!
Ingredients
Red Onion Confit
- 2.5 lb Julienne red onions
- 1 oz Butter
- 1 t Caraway seeds
- 1 t Fresh sage, chopped
- 1 t Fresh thyme, chopped
- 5 oz Red wine
- 5 oz Dark balsamic vinegar
- 3 oz Honey
Instructions
Prepare the confit
-
Julienne the onions, place in a bowl and set aside.
-
Assemble and prepare the remaining ingredients. Chop the leaves only for the sage and thyme.
-
Place all ingredients in a pot large enough to hold them. Bring the ingredients just to a boil, reduce the heat and cook until the liquids have started to thicken, the onions well cooked and the flavor loses the raw vinegar tartness.
-
Remove from heat, allow to cool and store in a resealable jar in the refrigerator.
Recipe Notes
There are 1001 tricks to prevent your eyes from watering when you cut onions. The only sure, certain, and fool proof way I've discovered to not cry when cutting onions is have someone else do the cutting. You will not cry.
Kidding aside, there is no way I've seen which prevents what is a basic function of the onion. So, if that is more onion than you wish to cut, make half a recipe.
Most red onions will be in the 8-10 oz range, so it's not as many as it might sound.
The seeds are really fruits, a bit more crescent shaped than cumin and 5 ridges. All that does not make visual identification easier; for that we rely on the nose.
Frilly Frilly Cocoa-Pop
Caraway smells of a slight heat, not as pronounced as cumin, and has a deeper warmth with notes of dried orange rind. Caraway does not posses that “dirty feet” aroma sometimes found in cumin.
 As a plant, it is in the carrot family and that means the leaves bear a strong resemblance to dill or fennel. The tops go to flower and make the fruits we call the seeds.
Those pretty frilly leaves can be eaten in salads, the stems used to flavor broths or soups, or if small enough, used in the vegetable mix for dinner, and the roots are edible, much like a parsnip.
Additionally the oil is used to flavor Kummel, a liquor produced in Germany and Russia and the Scandinavian Aquavit.[2]
Caraway appears to be easy enough to grow in the proper climate (check your zone and the plant’s needs) but I’ve not grown it. I have dabbled at  saving seeds from cilantro and found I did not plan well for their falling off the stem, rolling about the kitchen and making for more work and mess than I expected. I’ve been put off growing plants for their seeds since. I suppose I should remedy that.
How do your recognize a spice? “Hey, I know you!”
Rye bread is easily the most well known current food where the flavor of caraway almost defines it.
Yes, rye has it’s own taste, but the caraway is just the perfect match, Martin to Lewis, so to speak. In addition to rye bread, caraway is very good friends and play well with cabbages, including sauerkraut, and in some Dutch cheeses. European palates seem more tolerant of caraway than American palates which might be the big reason we see it used seldom here, and then almost as a boutique flavor, not a front and center flavor.
Caraway can be a quick addition to a pot of boiled (simmer, actually) wedged red potatoes, added to sausages or eggs. It is a good companion to fatty dishes of foul-goose or duck-or pork shoulders. Consider a simple dish of largely cut chunks of pork shoulder, parsnips, carrots, celery, leeks, bay leaf, caraway and potatoes. Start everything in a simple stock and let it simmer for as long as is necessary for the pork to be fall apart tender. Add the potatoes, depending on size, 30-45 minutes before it is done. That’s good eating.
Caraway Can Still The Wind
Caraway, along with many of its cousins, is considered a carminative, which basically takes the wind out of you.
Aside from the seeds in and sometimes on rye bread, “Caraway is also a good remedy for colds and congestion, it contains mild antihistamines, antimicrobial compounds that help to relax the muscles that cause coughing spasms. Caraway seeds are also used in a number of medicinal preparations for treating disorders such as rheumatism, eye infections and toothaches. Caraway seed oil is used in treating fungus infections as well, and is effective against candida infections. Caraway is often used in combination with peppermint oil to relieve the symptoms of irritable bowel syndromeand indigestion.”[3]
Play With Your Food
Give caraway a chance with roasted beets and carrots. Try using it with the foods it likes but in different ways. The aroma is so nice, and with few cool nights left, some hearty German food might still be on the table.
This recipe looks intimidating. It is easier than it appears. Hat tip to Daniel Leader, baker and author. It is his recipe I used and shared my mild modifications.

Artisan Rye bread
This is a rather long process for making bread, but when you taste the results, you'll see why it matters. Caraway adds an extra element of flavor, but you are, of course, free to omit it.
The process from scratch takes time to develop the wild yeast which creates the flavor and leavening for the bread. The chef is the base from which the starter will be made and from that the final dough.
While this initial process is long in days, it isn't difficult. And, once you have the chef, rye bread is only a few days.
Ingredients
Sourdough Rye starter-Chef Day 1
- 4 oz Spring water
- 3 oz Rye flour Organic, stone ground if you can find it
- Teeny pinch Fresh yeast or Instant yeast
Day 2
- 4 oz Spring water
- 3 oz Rye flour
Day 3
- 4 oz Spring water
- 3 oz Rye flour
Day 4
- 4 oz Spring water
- 3 oz Rye flour
Sourdough Starter
- 9 oz Chef
- 5 oz Rye flour
- 4 oz Spring water
Feed the chef
- 9 oz Chef
- 5 oz Spring water
- 4 oz Rye flour
Sourdough rye with caraway seeds
- 18 oz Sourdough starter
- 24 oz Spring water Leave the bottles on the counter.
- 9 oz Rye flour
- 9 oz Whole Wheat flour
- .75 oz Sea salt
- 1 oz Caraway seeds
- 20-25 oz Bread flour
Instructions
Day 1
-
Stir together these ingredients in a stainless steel bowl with a wooden spoon. Stir long enough to really get the gluten developed. Scrape clean the spoon, scrape down the bowl and cover with plastic wrap. Leave on the counter.
Day 2
-
The chef probably looks like wallpaper paste. It might have a light tart taste (yes, you can taste the starter). Add the flour and water. Stir to incorporate then really give it some stirring. Same as before. This lets in oxygen, which the yeast wants, and develops the gluten, which the bread wants.
Day 3
-
Your chef should so signs of life. It's okay to think Gene Wilder as Dr, Frankenstein here. It should be bubbly. Taste it to learn how the sour increases. A finger tip is enough. Add the flour and water and repeat the incorporating/stirring process from day 2.
Day 4
-
The chef is nearing readiness. It should have a big nose when you remove the plastic and show lots of signs of action: bubbles bubbling and a substantial increase in volume. Taste it again and notice the big difference in one day. Add the flour and water in our now usual manner.
The Rye Sourdough Starter
-
The Chef is the foundation, so to speak, for the finished bread. We're building structure, gluten, and flavor, the sour. Onto this foundation we are going to add more structure and flavor in the form of more water and flour, but this is ready for use sooner.
-
Scale 9 oz of chef into a bowl 6 qt stainless steel bowl and add to that the flour and water quantities. Stir as is the usual manner to form a glutenous, stretchy starter. If you have a clear, tall, narrow container, transfer the starter to it. Place a piece of masking tape so the top edge of the tape is even with the level of the starter to mark the top of the starter. This visual mark will make it easy to identify when the starter had doubled in volume.
It can be a helpful idea to mix the starter at night shortly before going be so in 8-10 hours, when the starter is ready, you've the time to make the final dough.
Feed the chef
-
The remains of the chef needs some love. You ought to have 9 oz of chef remaining. Add to that the flour and water, stir in the usual manner. Scrape the sides, cover well and secure the plastic with a rubber band and place the chef in the cooler. Use this for the next sourdough starter for the next batch. Every 7 days, discard half, feed again the same ratios.
Make the final dough
-
Using the room temperature water, add the starter and gently mix to break up the starter. A bit of foamy surface is good. Add the rye flour, and mix. Add the wheat flour and mix. Add the caraway and salt and a quarter of the bread flour and place the bowl on the mixer. Using the dough hook, mix on low to incorporate all the ingredients and for the dough. Hydration from flour to flour is different as well as elevation. As the dough mixes, add more bread flour. Watch the dough develop and determine if more flour is needed.
-
This dough is best when still a bit tacky and the dough at the bottom of the bowl sticks.
-
Transfer the dough to a lightly oiled stainless steel bowl to ferment, turning the dough to coat the entirety lightly in oil. Fermentation may take 3 hours. Remember there is next to no commercial yeast here, and this is a heavy dough so there's a lot for the yeast to push.
-
When the dough has fermented, remove the dough to the work space. Divide the dough in half, gently work it into a ball shape then form a loaf. Proof the loaves on a tea-towel lined stainless steel bowl or a benneton with the bottom side up.
-
Heat the oven to 450 degrees. Place the oven rack in the center of the oven for even heat distribution, and a small pan on the rack below the top rack. When the dough has proofed, about 2 hours, gently invert the dough onto a floured peel or inverted sheet pan and slide onto the baking stone in your oven. If you have not a baking stone, place a parchment lined sheet pan in the oven to become hot. Invert the dough onto the lined sheet pan (carefully please!) and score the top of the dough.
-
Bake the dough at 450 degrees The dough will respond well to the oven spring with some steam. Pour half a cup of water into the pan on the bottom rack and close the door quickly to keep the steam in. After 3 minutes, repeat the steaming process. When the dough starts to brown, reduce the temperature to 375 degrees. Bake for total of 40 minutes or until the bread has the hollow thump which indicates done bread.
-
Allow the bread to cool at least 20 minutes--I know--before cutting. Bad for bread it is to cut soon. Resist, you must, hmm.
-
Fresh butter is, in my opinon, the single best thing to spread on bread. But, superior preserves or jelly or jam or conserve or marmalade will do, too.
Recipe Notes
Bread making is easy. Sourdough bread making is a bit more advanced in knowledge level, not skill level. It is the mixing of flour and water and some stuff.
I understand lots of voices have lots of opinions and this is mostly just one more. You can do this. Sourdough bread used to be the only kind of bread before commercial yeast. Long before cookbooks people made bread every day.
Skill comes with experience and that's all. When you rode a bike or drove a car, the next stop wasn't the BMX track or the Detroit Gran Prix. Those skills took practice and so too does this.
Be patient and trust the process. Food from the heart tastes best regardless the appearance.
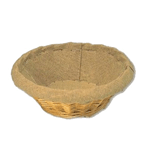
Matfer 118510 Banneton Linen-Lined Basket – 8-1/4″ – $31.60
from: Kerekes kitchen & Restaurant Supplies
[1] https://en.wikipedia.org/wiki/Caraway
[2] Rodale’s Illustrated Book of Herbs, Rodale Press, 1987, pg 63
[3] https://www.anniesremedy.com/carum-carvi-caraway-seed.php?gc=9&gclid=CjwKCAjwhcjVBRBHEiwAoDe5x4r95qKJ0Xd30JsKdOzCoG5Uhy-PqY1qsUUFTedRWsr7RCaqrZsVNxoC3ggQAvD_BwE