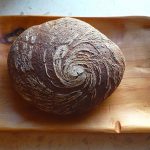
Artisan Rye bread
This is a rather long process for making bread, but when you taste the results, you'll see why it matters. Caraway adds an extra element of flavor, but you are, of course, free to omit it.
The process from scratch takes time to develop the wild yeast which creates the flavor and leavening for the bread. The chef is the base from which the starter will be made and from that the final dough.
While this initial process is long in days, it isn't difficult. And, once you have the chef, rye bread is only a few days.
Ingredients
Sourdough Rye starter-Chef Day 1
- 4 oz Spring water
- 3 oz Rye flour Organic, stone ground if you can find it
- Teeny pinch Fresh yeast or Instant yeast
Day 2
- 4 oz Spring water
- 3 oz Rye flour
Day 3
- 4 oz Spring water
- 3 oz Rye flour
Day 4
- 4 oz Spring water
- 3 oz Rye flour
Sourdough Starter
- 9 oz Chef
- 5 oz Rye flour
- 4 oz Spring water
Feed the chef
- 9 oz Chef
- 5 oz Spring water
- 4 oz Rye flour
Sourdough rye with caraway seeds
- 18 oz Sourdough starter
- 24 oz Spring water Leave the bottles on the counter.
- 9 oz Rye flour
- 9 oz Whole Wheat flour
- .75 oz Sea salt
- 1 oz Caraway seeds
- 20-25 oz Bread flour
Instructions
Day 1
-
Stir together these ingredients in a stainless steel bowl with a wooden spoon. Stir long enough to really get the gluten developed. Scrape clean the spoon, scrape down the bowl and cover with plastic wrap. Leave on the counter.
Day 2
-
The chef probably looks like wallpaper paste. It might have a light tart taste (yes, you can taste the starter). Add the flour and water. Stir to incorporate then really give it some stirring. Same as before. This lets in oxygen, which the yeast wants, and develops the gluten, which the bread wants.
Day 3
-
Your chef should so signs of life. It's okay to think Gene Wilder as Dr, Frankenstein here. It should be bubbly. Taste it to learn how the sour increases. A finger tip is enough. Add the flour and water and repeat the incorporating/stirring process from day 2.
Day 4
-
The chef is nearing readiness. It should have a big nose when you remove the plastic and show lots of signs of action: bubbles bubbling and a substantial increase in volume. Taste it again and notice the big difference in one day. Add the flour and water in our now usual manner.
The Rye Sourdough Starter
-
The Chef is the foundation, so to speak, for the finished bread. We're building structure, gluten, and flavor, the sour. Onto this foundation we are going to add more structure and flavor in the form of more water and flour, but this is ready for use sooner.
-
Scale 9 oz of chef into a bowl 6 qt stainless steel bowl and add to that the flour and water quantities. Stir as is the usual manner to form a glutenous, stretchy starter. If you have a clear, tall, narrow container, transfer the starter to it. Place a piece of masking tape so the top edge of the tape is even with the level of the starter to mark the top of the starter. This visual mark will make it easy to identify when the starter had doubled in volume.
It can be a helpful idea to mix the starter at night shortly before going be so in 8-10 hours, when the starter is ready, you've the time to make the final dough.
Feed the chef
-
The remains of the chef needs some love. You ought to have 9 oz of chef remaining. Add to that the flour and water, stir in the usual manner. Scrape the sides, cover well and secure the plastic with a rubber band and place the chef in the cooler. Use this for the next sourdough starter for the next batch. Every 7 days, discard half, feed again the same ratios.
Make the final dough
-
Using the room temperature water, add the starter and gently mix to break up the starter. A bit of foamy surface is good. Add the rye flour, and mix. Add the wheat flour and mix. Add the caraway and salt and a quarter of the bread flour and place the bowl on the mixer. Using the dough hook, mix on low to incorporate all the ingredients and for the dough. Hydration from flour to flour is different as well as elevation. As the dough mixes, add more bread flour. Watch the dough develop and determine if more flour is needed.
-
This dough is best when still a bit tacky and the dough at the bottom of the bowl sticks.
-
Transfer the dough to a lightly oiled stainless steel bowl to ferment, turning the dough to coat the entirety lightly in oil. Fermentation may take 3 hours. Remember there is next to no commercial yeast here, and this is a heavy dough so there's a lot for the yeast to push.
-
When the dough has fermented, remove the dough to the work space. Divide the dough in half, gently work it into a ball shape then form a loaf. Proof the loaves on a tea-towel lined stainless steel bowl or a benneton with the bottom side up.
-
Heat the oven to 450 degrees. Place the oven rack in the center of the oven for even heat distribution, and a small pan on the rack below the top rack. When the dough has proofed, about 2 hours, gently invert the dough onto a floured peel or inverted sheet pan and slide onto the baking stone in your oven. If you have not a baking stone, place a parchment lined sheet pan in the oven to become hot. Invert the dough onto the lined sheet pan (carefully please!) and score the top of the dough.
-
Bake the dough at 450 degrees The dough will respond well to the oven spring with some steam. Pour half a cup of water into the pan on the bottom rack and close the door quickly to keep the steam in. After 3 minutes, repeat the steaming process. When the dough starts to brown, reduce the temperature to 375 degrees. Bake for total of 40 minutes or until the bread has the hollow thump which indicates done bread.
-
Allow the bread to cool at least 20 minutes--I know--before cutting. Bad for bread it is to cut soon. Resist, you must, hmm.
-
Fresh butter is, in my opinon, the single best thing to spread on bread. But, superior preserves or jelly or jam or conserve or marmalade will do, too.
Recipe Notes
Bread making is easy. Sourdough bread making is a bit more advanced in knowledge level, not skill level. It is the mixing of flour and water and some stuff.
I understand lots of voices have lots of opinions and this is mostly just one more. You can do this. Sourdough bread used to be the only kind of bread before commercial yeast. Long before cookbooks people made bread every day.
Skill comes with experience and that's all. When you rode a bike or drove a car, the next stop wasn't the BMX track or the Detroit Gran Prix. Those skills took practice and so too does this.
Be patient and trust the process. Food from the heart tastes best regardless the appearance.