Pizza Dough
A great pizza dough that you like is a treasure. It is far more versatile than you think and can take sitting about in the cooler a few days waiting for you.
Ingredients
Pizza Dough
- 500 g Bread flour Unbleached if you can find it
- 10 g Salt
- 1 g Instant yeast 1.35 g Active, 2.7 g Fresh
- 310 g Cool water
- 15 g Extra virgin olive oil
- 25 g Cool water
Instructions
Mix the dough
-
The first thing you might notice about that recipe is there are two calls for water. I learned this technique working with a French baker. He had learned this technique at school and it’s pretty smart. The basic idea is we know what the dough wants for water. We give it most of that right away, let the dough mix till nearly done, then sneak in that last bit. The dough has to work very hard to absorb that last bit of water and in the process of working that extra amount, the gluten is being developed. Pretty slick. I will add this caution: it can be very messy if you try to add too much too soon. Drizzle the water. Or you’ll wear it.
-
Place the 310 g water into the mixing bowl to the stand mixer. If you are mixing by hand, good for you, and follow the steps as listed. Add the oil and the dry ingredients and mix. With the mixer, on speed 1 or low for 3 minutes. Then turn the mixer to speed 2 or medium for another 3 minutes. The dough should be a dough and not shreds of floury mess. If that’s not the case, mix 1 more minute and see if that helps. If it does not help, add the last of the water and make another 25 grams of water. Mix the first addition slowly and if that brings the dough together and the dough cleans the sides of the bowl, than on speed 1, slowly, drizzle, the water into the dough. Allow the dough to absorb all the new water and that’s it. The dough is done.
-
If you are mixing by hand, add all the water in stage 1, then all the dry and oil and begin mixing. Once the dough has started to come together, knead the dough on the table. You may need a little bit of bench flour, which is a bakers term for flour that is not part of the recipe onto which you knead the dough.
-
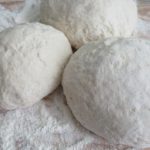
Once the dough is done, remove it, shape it round and add it to a lightly oiled bowl, cover the bowl, not the dough, with plastic wrap, and set a timer for 30 minutes. After 30 minutes, uncover the bowl. Reach into the bowl, put your fingers under the forward portion of the dough and pull up. It’s okay if part of the dough sticks. Pull that part of the dough to the center and repeat that process from the lower part. Basically, you are folding the dough like a business letter. Pick the dough up, turn it over so the seam is on the bottom of the bowl, cover the bowl with the plastic and set the timer for another 30 minutes. At the end of 30 minutes, the dough is done. Place it in cooler for a few hours to slow the yeast’s growth. If you make it a day or three ahead, place it in a plastic bag and remove as much air as possible.
-
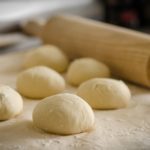
I use a rolling pin for my pizza dough. In my home kitchen it’s cleaner and faster. In commercial kitchens we did it by hand and tossed it and it was cool and neat and a huge mess. You can find too many videos on YouTube by people of various skills showing you ways to shape your dough. Get there. How is less important that what happens after. And, if you make a hole, pinch the dough together and it’ll be fine.
-
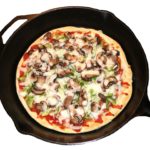
White pizza, sauce, no sauce, topping aplenty or barren, the prime key is a hot oven which is 450 degrees and a pizza stone. The stone helps a great deal but isn’t required. If you don’t have a pizza peel, a sheet pan will work. I use a peel, the pizza paddle thingy, and always always cornmeal on the peel first. Roll the dough and place it on the peel. Then add the sauce and toppings. If you try to do this the other way, it will make a mess and make you angry. Avoid both of those things.
-
Working the dough off of a peel is a bit of a skill and a bit of luck, at first. Remember Newton’s law of motion? An object at rest tends to stay at rest. Well, the pizza on the peel is at rest. It wants to stay that way but you need to get that peel out from under. How. Speed. The pizza has been sitting on the peel for a few minutes and the corn meal serves as the means for it to slide. Dough on the peel with no buffer is not good. It will stick and your toppings will be all over the bottom of the oven. So, quickly shake the peel back and forth an inch or two—a jiggle-- just to give the pizza some movement. Objects in motion tend to stay in motion. You want to verify the pizza will come off the peel in the oven. When you get the peel over the pizza stone, use that same jiggle motion to move the pizza to the edge of the peel and then onto the stone. Once it starts it comes off the peel pretty easily and onto the stone. Depending on how many toppings you have, 3 or fewer I lower the temperature to 425 right away. 4 or more toppings and I wait 5 minutes then reduce the heat to 425. Start the timer for about 8 minutes. At 4 minutes, open the door and work the peel under the pizza and work to turn it front to back. Bake the remaining 4 minutes. Pizza is done when the bottom of the crust is well browned, not by how melty the cheese is. Check the crust.

-
Once the pizza is out of the oven, it needs to rest. Allow it a few minutes for the cheese to cool enough to stick to the pizza. Also, super hot cheese makes Napalm seem cool. After those long few minutes, cut the pie, grab a plate and a beer and enjoy. Of course, pie of pumpkin is for dessert.
-
If you are making your pizza on a pan, the stretching and cooling remain the same. Shape the dough to fit the pan, with the necessary addition of Extra Virgin olive oil on the pan. I add cornmeal only because I like the crunch. Enjoy.